
728x90
반응형
이미지에 대한 URL이 JSON에 포함되어 있을 때, 멀티모달 모델을 훈련시키기 위해서는 JSON 데이터와 해당 이미지를 함께 학습에 사용할 수 있어야 한다.
따라서 JSON 내의 이미지 URL을 활용해 실제 이미지를 다운로드하는 작업이 필요하다.
사용한 데이터셋은 Amazon Review Data이다.
(https://cseweb.ucsd.edu/~jmcauley/datasets/amazon_v2/)
해당 데이터셋의 리뷰 포맷은 아래와 같다.
{ "image": ["https://images-na.ssl-images-amazon.com/images/I/71eG75FTJJL._SY88.jpg"],
"overall": 5.0,
"vote": "2",
"verified": True,
"reviewTime": "01 1, 2018",
"reviewerID": "AUI6WTTT0QZYS",
"asin": "5120053084",
"style": { "Size:": "Large", "Color:": "Charcoal" },
"reviewerName": "Abbey",
"reviewText": "I now have 4 of the 5 available colors of this shirt... ",
"summary": "Comfy, flattering, discreet--highly recommended!",
"unixReviewTime": 1514764800 }
여기에서 "image" 필드의 url string을 가져와서 이미지를 /images 폴더에 다운로드할 계획이다.
import os
import time
import json
import requests
from tqdm import tqdm

os.makedirs("images", exist_ok=True) # 이미지 저장용 폴더 생성

#  봇으로 간주되는 것을 방지하기 위한 요청 헤드
headers = {
    "User-Agent": "Mozilla/5.0 (Windows NT 10.0; Win64; x64) AppleWebKit/537.36 (KHTML, like Gecko) Chrome/120.0.0.0 Safari/537.36"
}

image_urls = []

#  JSON 파일에서 이미지 URL 리스트 추출
# with open(json 파일 이름, "r", encoding="utf-8") as f:
with open("Home_and_Kitchen_5.json", "r", encoding="utf-8") as f:
    lines = f.readlines()

for line in lines:
    try:
        item = json.loads(line)
        images = item.get("image", [])
        if images:
            image_urls.append(images[0])  # 첫 번째 이미지 URL만 추가
    except Exception as e:
        print(f"Error processing line: {e}")

# 이미지 다운로드
for idx, url in tqdm(enumerate(image_urls), total=len(image_urls), desc="Downloading Images"):
    for attempt in range(3):  # 최대 3번 재시도
        try:
            response = requests.get(url, headers=headers, timeout=10)
            if response.status_code == 200:
                filename = url.split("/")[-1]  # URL 맨 끝 파일명 사용
                with open(f"images/{filename}", "wb") as f:
                    f.write(response.content)
                break
            else:
                print(f"Failed (status {response.status_code}) on attempt {attempt+1}: {url}")
        except Exception as e:
            print(f"Error downloading (attempt {attempt+1}): {url} / Error: {e}")

        time.sleep(1)  # 실패 후 1초 대기

    time.sleep(0.5)  # 요청 간격 0.5초로 제한
이렇게 다운로드 받은 이미지는 PIL의 Image.open()을 사용해서 열고, .convert('RGB')로 색상 모드를 'RGB'로 바꾼 뒤,
from PIL import Image
image = Image.open(image_path).convert('RGB')

# import matplotlib.pyplot as plt
# w, h = image.size
# plt.figure(figsize=(5, 5))
# plt.imshow(image)
# plt.title(f"Original Image\nSize: {h} x {w}")
# plt.axis("off")
# plt.show()
Tensor 형태로 변경해 모델에 사용하면 된다.
from torchvision import transforms
transform = transforms.ToTensor()
tensor_image = transform(image)

# CNN 입력을 위한 transform 정의
# cnn_transform = transforms.Compose([
#     transforms.Resize((224, 224)),  # CNN이 기대하는 크기로 조정
#     transforms.ToTensor(),
# ])
# cnn_tensor_image = cnn_transform(image)
Tensor 형태로 변경한 이미지를 시각화하는 방법은 아래와 같다.
import matplotlib.pyplot as plt
from torchvision.transforms.functional import to_pil_image

# 시각화를 위한 PIL 이미지로 변환
image1 = to_pil_image(tensor_image)
image2 = to_pil_image(cnn_tensor_image)

plt.figure(figsize=(10, 4))

plt.subplot(1, 2, 1)
plt.imshow(image1)
plt.title(f"tensor_image\n{tensor_image.shape}")
plt.axis("off")

plt.subplot(1, 2, 2)
plt.imshow(image2)
plt.title(f"cnn_tensor_imageResized to 224x224\n{cnn_tensor_image.shape}")
plt.axis("off")

plt.tight_layout()
plt.show()
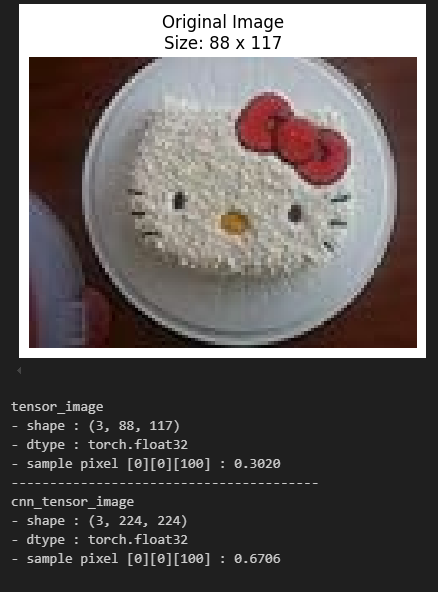
Amazon Review Data의 Home_and_Kitchen_5.json의 535445 line의 image를 tensor로 변경 후 시각화하면 아래와 같다.

728x90
반응형